


Here is a way to express "I love you" or something else for someone for $50.
You need to buy some hardwares from eBay, Amazon or Aliepress. You also need to download a software and/or a driver for a particular chip.
It wiil probably take you an hour to download software, install it, connect the wres, run the software and program the chip.
The hardware is a board called Arduino UNO R3.
Arduino is a popular microcontroller board for hobby electronics. https://en.wikipedia.org/wiki/Arduino
This board uses a microcontroller called ATMEGA328 or an alternative chip:
which has its own memory, you could program the chip with a language called Processing (very similar to C language), let your program do something for you, like in this project, let an RGB LED matrix board diplay "I love you|"or whatevery you want to say to your boy friend, girl friend, wife, husband, daughter, son........... This project is easy, so you could even help your kids to do it at age 5 or 6.
A microcontroller is a chip. It is similar to a chip caller CPU (like Intel i3, i5, i7 in PCs or Apple M1, M2 in Apple computers. They are called microprocessor) in your computer.
Microcontrollers and microprocessors have different ways of organizing and optimizing a computing system based on a CPU. While a microcontroller puts the CPU and all peripherals onto the same chip, a microprocessor houses a more powerful CPU on a single chip that connects to external peripherals.
The free software is Arduino IDE (integragted development environment) , this software has been downloaded for more than 74 million times. With this software, you could write your own codes, the software will compile your codes to binary codes which the microcontroller could understand, burn and store the binary codes in the chip's memory (a process called programming). When the binary files are running after programming, the chip is doing whatever you need to do.
Arduino UNO R3 board:

Finished project:

Back of the RGB LED matrix:

Photo:

Photo:

Video:
For hardware:
1. Arduino UNO R3 board:
NEW - Genuine Arduino Uno R3 - Authorized US Reseller:
$27.95, from Florida
or:
UNO R3 ATmega328P ATmega16U2 Board + USB Cable + Clear Case For Arduino:
https://www.ebay.com/itm/115094579073?hash=item1acc2be781:g:JGsAAOSwAa9hkKsd&amdata=enc%3AAQAIAAAAwN02iIeJWD9vqJ6t1s%2BP9HUe%2FoINtu3WvBMN1NWrqTu3utj8NjmLI9xU42YKMohJbzDl%2FWS2JL%2BryH6sntATacITtUmqfuUTAd1lG50mOQKaR7oUw%2FvOFCyoQq%2Bdd6O77LaqJoUD%2BL2aImwlHDQhatz1nv%2BZgO2pWYiA%2BCpulQQM7K9hP%2FnUsrqN3tBuKck7k1l2zzVgW7Jp9Nt1OTP0xOqFBqxkAd1MfVHYuOjrGD%2BCDd5dYvsl%2FAIZlWSppPCutg%3D%3D%7Ctkp%3ABk9SR7S8juOzYg (this is not a genuine board, the advantage of this boars is in the future you could take the chip off from the board with several parts to make a smaller board yourself)
$14.98, from California
or:
Arduino UNO R3 SMD Development Board+USB CABLE:
https://www.ebay.com/itm/385691495267?hash=item59cd012b63:g:UN8AAOSw2vxkju2o&amdata=enc%3AAQAIAAAAwN2iTTCkY0J%2 FJZxy%2FzF4ndKZiO54aoOAyoC%2BF1Rvxrfd3x9TKtMe%2FvG5JfwiGSFUyC2KRiRGGF3qNMcfd7ClvEN5Tm9QkpS7SPYGzeJvmlCfMK%2F6yoQfnmFLoSsnsVZD0loo0A6oOhhzevEeUBwNXtJo8zQOg5ofTevlqzzGdvLV%2B0uQ%2FpbmbCzakgfj2nX5Gy82eja%2FVDG0lR7cELqIhsB1MIcM1EfARiVF%2FknQOKgt%2FmpqkANMS8%2FkYDs4YmnAzQ%3D%3D%7Ctkp%3ABk9SR7S8juOzYg (not a genuine board, but cheap, works, you need to download a driver ch341ser3.exe from http://envistia.info/ch340serialdrvr )
$8, from China
to install the driver, click on the link above, then you will find ch341ser.exe. Click on 下载
When finished, click on ch341ser.exe, you will see "exe for driver installation. Click on yes. That will install the driver for a chip on this board.
(This is a board similar to the one I used for this project).
2. a RGB LED matrix 5050 module (DC5V WS2812B Led Digital Panel Matrix Flexible Screen 8*8 16*16 8*32 5050 RGB WS)
choose "8x32 Ws2812 Panel"
$15.54 from Shenzhen, China
3. Option:
A power supply for Arduino (if you want to use the board alone without your computer after the chip on the board is programmed). If you just want to use Arduino UNO R3 board and the matrix display with your computer, you don't need this.
9V 2A AC Power Supply Adapter 5.5x2.1mm Input 100V-240V for Arduino UNO R3 MEGA
$8.59 from California.
4. Option (If you don't want to use a power supply from AC after the microcontroller chip is programmed, these are what you needed. But battery will be quickly running out since this project needs from 0.19-0.63 A DC depending on different colors):
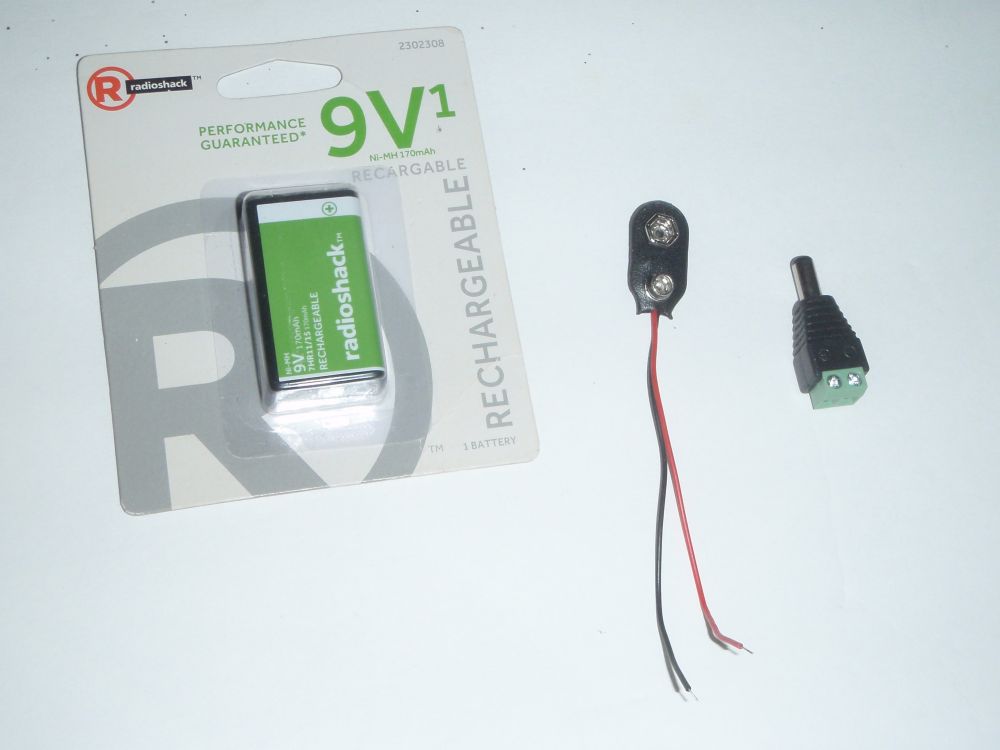
9 V rechageable battery
9 V battery clip
3 Pcs Snap 9V (9 Volt) Battery Clip Connector T Type Black w Cable LW
$1.99 from Georgia
a power plug 5.5x2.1 mm
(10-pack) Male DC Power Adapter Plug 5.5 x 2.1 mm for LED Strip Light
$3.89 for 10 pieces, from Indiana
Rechargeable battery (left), battery clip (middle) and power plug 5.5x2.1 mm (right), make sure the inner is positive and the outter
is negative.
For software:
Adduino IDE:
Goto arduino.cc
Goto softwre
Chose Windows, maxOS, Linus
For example, click on “Windows”to download Arduino ide 2.1.1
Click on “Just download”
You will get Arduino-ide_nightly-20230726_Windows_64bit.zip
Click on Arduino-ide_nightly-20230726_Windows_64bit.zip
Click on “Extract all”
Choose or create a folder, such as arduino
Click on “Extract”
For installing hardware:
Connect the red wire of 8x32 matrix to female pin “5 v” on Arduino UNO R3 board (see the first picture),
Connect the white wire of 8x32 matrix to female pin “GND” on Arduino UNO R3 board
Connect the green wire of 8x32 matrix to female pin 6 on Arduino UNO R3 board (upper side of the board on the first picture)
Connedt USB port of Arduino UNO R3 board to your computer USB port with a USB cable came with the board
For adding programming codes to Arduino and running Arduino IDE:
To run Arduino, goto the folder of Arduino, click on Arduino IDE
Click on tools
Click on libraries
For "Type" choose All; for "Topics" choose “Display”
Move your cursor until you find "Adafruit NeoMatrix", choose “install All”
Goto sketch
Goto new they will set sketch_jul31a
Copy and paste the following codes to sketch_jul31a (yesterday's date, Arduino created for you). Notice that I did not write the codes, it was an example from one of three libraries, I just modified several lines.
#include <Adafruit_GFX.h>
#include <Adafruit_NeoMatrix.h>
#include <Adafruit_NeoPixel.h>
#define DATA_PIN 6
#define arr_len( x ) ( sizeof( x ) / sizeof( *x ) )
// setting matrix
Adafruit_NeoMatrix matrix = Adafruit_NeoMatrix(32, 8, DATA_PIN,
NEO_MATRIX_TOP + NEO_MATRIX_LEFT +
NEO_MATRIX_COLUMNS + NEO_MATRIX_PROGRESSIVE + NEO_MATRIX_ZIGZAG,
NEO_GRB + NEO_KHZ800);
char* Text[]= {"I love you!", "Happy birthday!", "How are you doing?","Best Wishes"};
const uint16_t colors[] = {
matrix.Color(255, 0, 255), matrix.Color(100,255,0), matrix.Color(255,255,0), matrix.Color(0,0,255), matrix.Color(255,0,255), matrix.Color(0,255,255), matrix.Color(255,255,255)};
int brightness = 80;
// end
int numMode = arr_len(Text) - 1;
int numColor = arr_len(colors)-1;
int pixelPerChar = 4;
int maxDisplacement;
int mode =0;
void setup() {
matrix.begin();
matrix.setTextWrap(false);
matrix.setBrightness(brightness);
matrix.setTextColor(colors[0]);
}
int y = matrix.height();
int x = matrix.width();
int pass = 0;
int line_pass =0;
void loop() {
if (mode > numMode) {mode = 0;}
matrix.fillScreen(0);
matrix.setCursor(x, 0);
scroll(Text[mode], 15);
}
// scrolling
void scroll(char* message, int delays) {
maxDisplacement = strlen(message) * pixelPerChar + matrix.width();
if(++line_pass > matrix.width()) line_pass = 0;
matrix.print(String(message));
if(--x < -maxDisplacement) {
x = matrix.width();
if(++pass >= numColor) { pass = 0; };
matrix.setTextColor(colors[pass]);
mode++;
}
matrix.show();
delay(delays);
}
Goto “Select Board”
You will find USB board and com3 (your computer might be different from com3)
Then drag down the choices, find “Arduino UNO”and click
So the board is now Arduino UNO and com3
Click on “upload symbol” (right arrow)
when the red LED light stop blinking, you find the message might be like this

You will get running words like “I love you”…… on 8x32 matrix
Save your work before leaving.
If you want to run the program without your computer after programming, just use the power supply, choose 9 V I prefer 2A, in case in the future you need it. The power plug should be positive for the inner and negative for the outter.
If you want to run with an external battery after programming, choose a 5.5x2.1 power plug, connected with a 9 V rechargeable battery. Be careful with the polarity: inner is positive; outer is negative. Current might be around 0,19-0.63 A. A 9 V battery will be quickly dead unless you use a rechargeable 9 V battery.
Thank you!
