


chinaibc的朋友从纽约回来,特地给她背了个JUNIOR Red Velvet Cheese Cake/Junior 红丝绒芝士蛋糕 回来。 chinaibc在朋友圈里一炫耀,团长下班就到她家报道了。 厚脸皮带走一大块,吃了觉得味道不错,下决心自己做。 买了本Junior自己的食谱书,照着做了。 发现原方的芝士蛋糕好吃,但红丝绒蛋糕太干,自己很不满意。
这款最受老美欢迎了。给小熊猫老师送礼什么的,大家都是大爱,非要找我要方子。 英文方子放最后了, PDF Version is here。

于是自己把这红丝绒蛋糕改成很湿润的南方版本,当然糖的用量减半了。 我改过的版本,真是老中老美全爱啊。 吃喝团聚会带去很受欢迎,老板退休爬梯带去单位,那个抢得快啊。 单位上没几个真正爱做饭的。好几次同事一提起Wholefoods的蛋糕,那向往的样子啊,我还以为真的好吃得上天了。 后来同事还真买个他们认为最最好吃的来单位。结果被我这挑食的暗暗地在心里鄙视到现在啊。 哈哈,给原来老板做的蛋糕受到的好评太多了,其中包括:把Wholefoods的蛋糕全比下去了;我从来都不感冒红丝绒蛋糕,但这个蛋糕和芝士蛋糕放一起太好吃了;啊,我还第一次吃蛋糕和芝士蛋糕组合起来的,太好吃了。 呵呵,这下知道我们山区人民的美食标准了吧? 在纽约或者湾区,LA的可能对这样的蛋糕根本不懈啊。
其实这蛋糕不难做,就是步骤多些。 比起鱼儿的菊花豆腐这样的工夫菜,真是小巫见大巫啊。
红丝绒蛋糕
这蛋糕超级容易,容易到我都不能相信,而且成品比原方还要打发蛋白什么的容易多了,但味道好。 先声明哈,红丝绒蛋糕的色素用得多哦,不是什么健康食品。但这个就是图个好看,而且情人节做个这很应景。

材料:

1. 2杯蛋糕面粉/ 2 cups cake flour
2. 1茶匙小苏打/1 teaspoon of baking soda
3. 1茶匙发酵粉/1 teaspoon of baking powder
4. 1茶匙盐/1 teaspoon of salt
5. 2大匙无糖可可粉/2 Tablespoons unsweetened, cocoa powder
6. 1杯糖/1 cup sugar
7. 1杯色拉油或菜籽油/1 cup vegetable oil or canola
8. 2个鸡蛋/2 eggs
9. 1杯酸牛奶/ 1 cup buttermilk (这个可以自己做,不用特地去买。 一杯牛奶加一大匙柠檬汁,搅拌一下,放5分钟,就可以当酸牛奶用了。)
10. 2茶匙香草精/2 teaspoon of vanilla extract
11. 一大匙糖蜜/molasses (可省)
12. 一大匙红色食用色素/1 tablespoon red food coloring
13. 1茶匙白醋/1 teaspoon of white distilled vinegar
14. 半杯准备的热咖啡/ 1/2 cup of hot coffee
做法:

1. 烤箱预热到325F度,两九寸的烤盘垫上烤盘纸/pachment paper。
2. 所有干料(面粉,小苏打,发酵粉,盐,可可粉,糖) 混合好, 过筛。
3. 所有湿料(油,鸡蛋,酸牛奶,香草精,色素,白醋,咖啡,糖蜜)搅拌均匀。
4. 然后把干料和湿料混合,搅拌均匀(就用打蛋器手动地搅搅就可以了,容易吧?),用过滤网过滤下,倒入两九英寸的烤盘里,入烤箱烤三十分钟左右,或者直到牙签插入取出是干净的。 注意不要烤过头了!根据自己烤箱来定,最好25分钟时就看着烤。
5. 蛋糕烤好后,立即取出,倒扣到垫了烤纸的架子上。等蛋糕完全凉下来,用保鲜膜包好,放冰箱备用。
实习期的小熊猫
芝士蛋糕
材料:

1. 三盒8盎司全脂奶油奶酪/Philadelphia cream cheese,在室温下软化(特别注意,一定要等奶油奶酪完全软化后用,否则搅出来的面糊总是有硬块,影响成品)
2. 1杯糖/ 1 cups sugar
3. 3大匙玉米淀粉/3 Tbsps. cornstarch
4. 1大匙香草精/ 1 Tbsp. pure vanilla extract
5. 两个超大鸡蛋/2 extra large eggs
6. 2/3杯重奶油/ 2/3 cup heavy or whipping cream
做法:
1. 烤箱预热到 350F 度
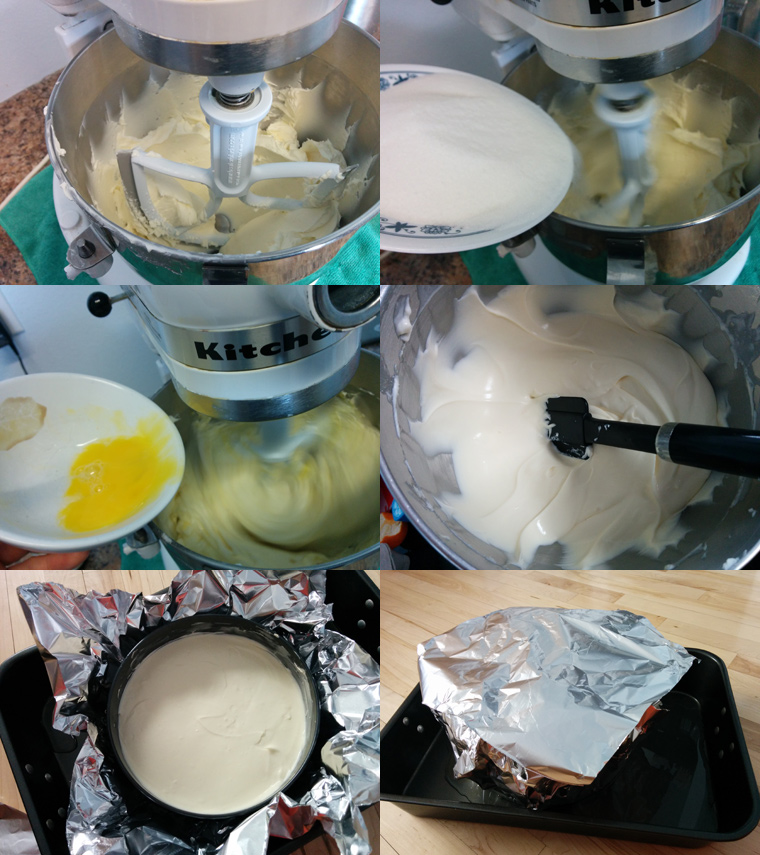
2. 将一包奶油奶酪,1/3杯糖和3大匙玉米淀粉放搅拌机里,用最低速搅拌3分钟。 然后加入剩下的两盒奶油奶酪,一次一包,搅拌3分钟。
3. 速度升到中速,把剩下的2/3杯糖加入,然后加香草精,一次一个加入鸡蛋, 搅拌均匀。把速度又调到最低,慢慢加入重奶油/heaving whipping cream, 完全搅拌均匀就停机器。现在的面糊看上去应该是均匀松软的样子。
4. 把9英寸的烤盘底垫张锡箔纸,然后盘子边上抹上黄油。 把面糊倒入烤盘,用小刀将表面抹平。
5. 把圆形烤盘用一张厚的锡箔纸包起来,上面再盖张锡箔纸。圆形烤盘放大烤盘里,注水到一半左右。
入烤箱烤一个小时到70分钟左右,或者直到蛋糕体中间没稀糊糊。 蛋糕烤好后,最好不要直接从烤箱里取出。 烤芝士蛋糕最忌讳一冷一热的,这样会引起蛋糕体起裂。 最好把蛋糕从水盆里取出,把烤箱门打开。
6. 等蛋糕完全冷却后,取出来,放盘子里,用保鲜模包起来,放冻箱冻上最少四个小时。 (当然也可以不把蛋糕从烤盘里取出来,直接放冻箱。 但是我第一次这样做,取出来后忘了用热毛巾捂下弹簧的地方,一开弹簧开关,人家就断了。只好再去买个烤盘。)
表面装饰用奶油
加了奶油奶酪/cream cheese的蛋糕装饰奶油味道特别好。 但是我看过好几个网友的奶油真是惨不忍睹,奶油奶酪没打光滑的结果。 结果我自己一次没注意也犯了同样的错误,那成品可真不敢恭维。 所以大家记得了,加了奶油奶酪/cream cheese要室温软化一下,加糖搅拌均匀了才和打发好的奶油混合!
材料:
1. 1.5 盒16盎司奶油奶酪/cream cheese,室温软化
2. 1-1.5杯糖粉 / powdered sugar
3. 3杯鲜奶油/heavy whipping cream
做法:
1. 用打蛋器高速打发鲜奶油,中间慢慢加如半杯糖粉,直到硬性打发。
2. 奶油奶酪室温软化一下,然后和剩下糖粉搅拌均匀(手打或者机器打都可以)。
3. 把第一第二部的两样混合起来,再搅拌均匀。最好放冰箱冷藏一下再用,做出来的花纹会好看些。
蛋糕组装

1. 把冰冻过的芝士蛋糕取出,放室温 10 分钟。
2. 蛋糕盘子底抹点打发的鲜奶油,放片蛋糕,然后抹上厚厚一层鲜奶油。
3. 把冰冻过的芝士蛋糕放蛋糕片上,揭掉锡箔纸,然后抹上厚厚一层鲜奶油。
4. 再放片蛋糕,然后抹上厚厚一层鲜奶油。
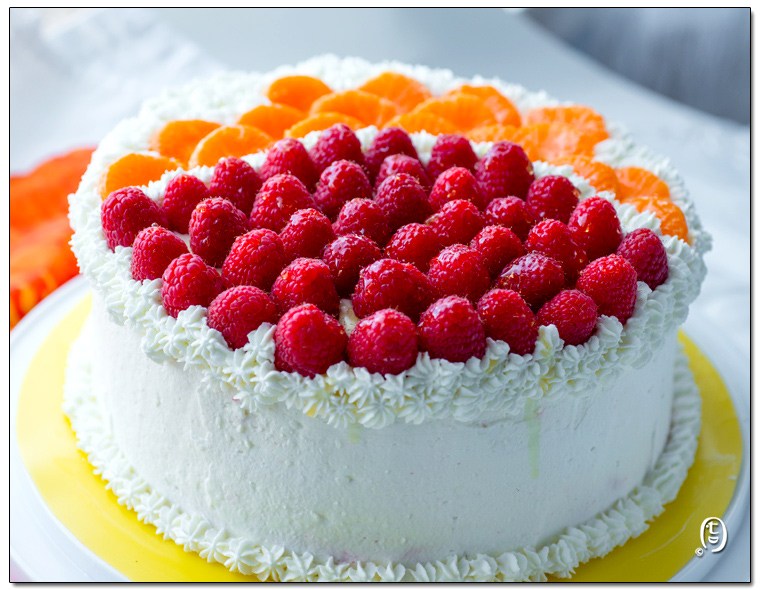
5. 然后就自己发挥了装饰了。 其实我也抹不平鲜奶油。第一个是叫奶奶抹的,第二个实在抹不平,就再四周挤几朵花。其实我把这几朵花也挤得歪瓜劣枣地,但哄哄不会做蛋糕的老美还是很成功啊。

6. 最上面当然放覆盆子/raspberries,然后刷些Glaze。就把草莓酱这样红色的果酱,加几滴水,小火热一下,过滤后的浓汁就可以拿来刷水果了。 Raspberries 和这蛋糕特别配,不但颜色配,味道也是绝配。

英文版
CHEESECAKE
Ingredients
- 3 (8-ounces each) packages Philadelphia cream cheese. At ROOM TEMPERATURE!!!
- 1 cup granulated sugar
- 3 Tbsps. cornstarch
- 1 Tbsp. pure vanilla extract
- 2 extra large eggs or 3 regular size eggs
- 2/3 cup heavy or whipping cream
Steps:
- Preheat the oven to 350 F degrees.
- Lightly coat a 9-inch springform pan with nonstick spray and then wrap the pan with heavy duty aluminum foil and extend all the way up the side.
- Add 1 pack (8oz) of cream cheese, ? cup of sugar, and 3 Tbsps. Cornstarch in an electric stand mixer. Beat on lowest setting(speed 1) for about 3 minutes to make a stable starter batter. (using a beater blade is the best)
- Then add another package of Cream Cheese mix for another 3 minutes, then the last pack and mix for another 3 minutes.
- Increase the mixer speed to medium and beat in the remaining 2/3 cup of sugar, then 1 Tbsp. pure vanilla extract, then eggs, one at a time , mix until smooth. Don’t over mix!
- Gently pour the batter into the springform pan and smooth out the surface.
- Use another sheet of aluminum foil to loosely cover the pan. Use the edges of the bottom sheet to create “walls” for the top sheet. Kind of like creating a roof for the pan.
- This is a very important step, DON’t skip!!! Place the springform pan in the center of a large shallow pan containing hot water that comes about 1 inch up the side of the springform pan.
- Bake the cheesecake for around 65-70 minutes until it is set and not jiggly in the middle. Don't use toothpick to test. If the center is not jiggling, it is done. Don't over bake it.
- Turn oven off. Take the baking pan out of water, remove aluminum foil, and then put the pan back to oven, leave the oven door open. Let cheesecake cool off in oven slowly. If you take the cheesecake out and cool in room temperature, it most likely will crack.
- When the cheesecake is completely cooled, take it out of the baking pan, wrap the cake with plastic wrap and freeze it for at least 4 hours.
Red Velvet Cake
This is a super easy cake but very moist if you don’t over bake it.
Ingredients
Make the cheesecake layer at least half days ahead.
- 2 cups cake flour
- 1 teaspoon of baking soda
- 1 teaspoon of baking powder
- 1 teaspoon of salt
- 2 Tbsp unsweetened, cocoa powder
- 1 cup sugar
- 1 cup vegetable oil or canola oil
- 2 large eggs
- 1 cup buttermilk (or you can use 1 cup of milk and 1 table spoon of lemon juice, mix and set it for 5 minutes)
- 2 teaspoon of vanilla extract
- 1 Tbsp molasses (can be omitted)
- 1 tablespoon red food coloring
- 1 teaspoon of white distilled vinegar or white wine vinegar
- 1/2 cup of hot and strong coffee
Steps
- Preheat the oven to 325F.
- Line two 9” round baking pan with parchment paper, and grease sides.
- Mix all dry ingredients (cake flour, baking powder, baking soda, salt, cocoa powder, sugar), and sift dry ingredients mixture.
- Mix all wet ingredients (eggs, buttermilk, oil, vanilla extract, molasses, food coloring, vinegar, coffee).
- Mix dry and wet ingredients until smooth. Don’t need mixer, just a whisk and hand mix this.
- Divide batter between prepared cake pans and bake until a toothpick inserted into the middle comes out clean, 25 to 30 minutes.
- Take the cakes out of pan and cool them on a wire rack.
Cream Cheese Frosting
Ingredients
- 2 (8-oz) blocks cream cheese, at room temperature
- 1.5 cup powdered sugar
- 3 cups heavy whipping cream
Steps
1. Mix cream cheese and 1 cup of powdered sugar on low speed until smooth
2. Use another mixing bowl for whipping cream. Beat the heavy whipping cream on high speed and add half a cup of powdered sugar slowly, beat until stiff peaks form.
3. Add cream cheese mixture from step 1 into heavy whipping cream, beat on speed 1 until smooth.
Assemble cake
- Let the frozen cheesecake set in room temperature for 10 minutes
- Put one piece of cake on the bottom, add a layer of frosting, then cheesecake layer, another layer of frosting, and another layer of red velvet cake. Frost top and sides of cake.
- Decorate the cake with raspberries if you wish or press red velvet cake crumble onto sides of cake.
Glaze
If you want raspberries shiny, you can glaze them. Two tablespoons of strawberry jam, add few drop of water, microwave it for 15-20 seconds. Use the “juice” to brush raspberries.

谢谢你!